
How to Lock the iPhone Screen for Kids with Guided Access
You hand your phone to a four-year-old so they can watch one episode. Ninety seconds later they have exited the app, opened your photos, and sent a voice memo to your boss.
Apple has a free, built-in feature that prevents exactly this. It is called Guided Access, it lives in Accessibility rather than in parental controls, and most parents have never heard of it.
Short Answer
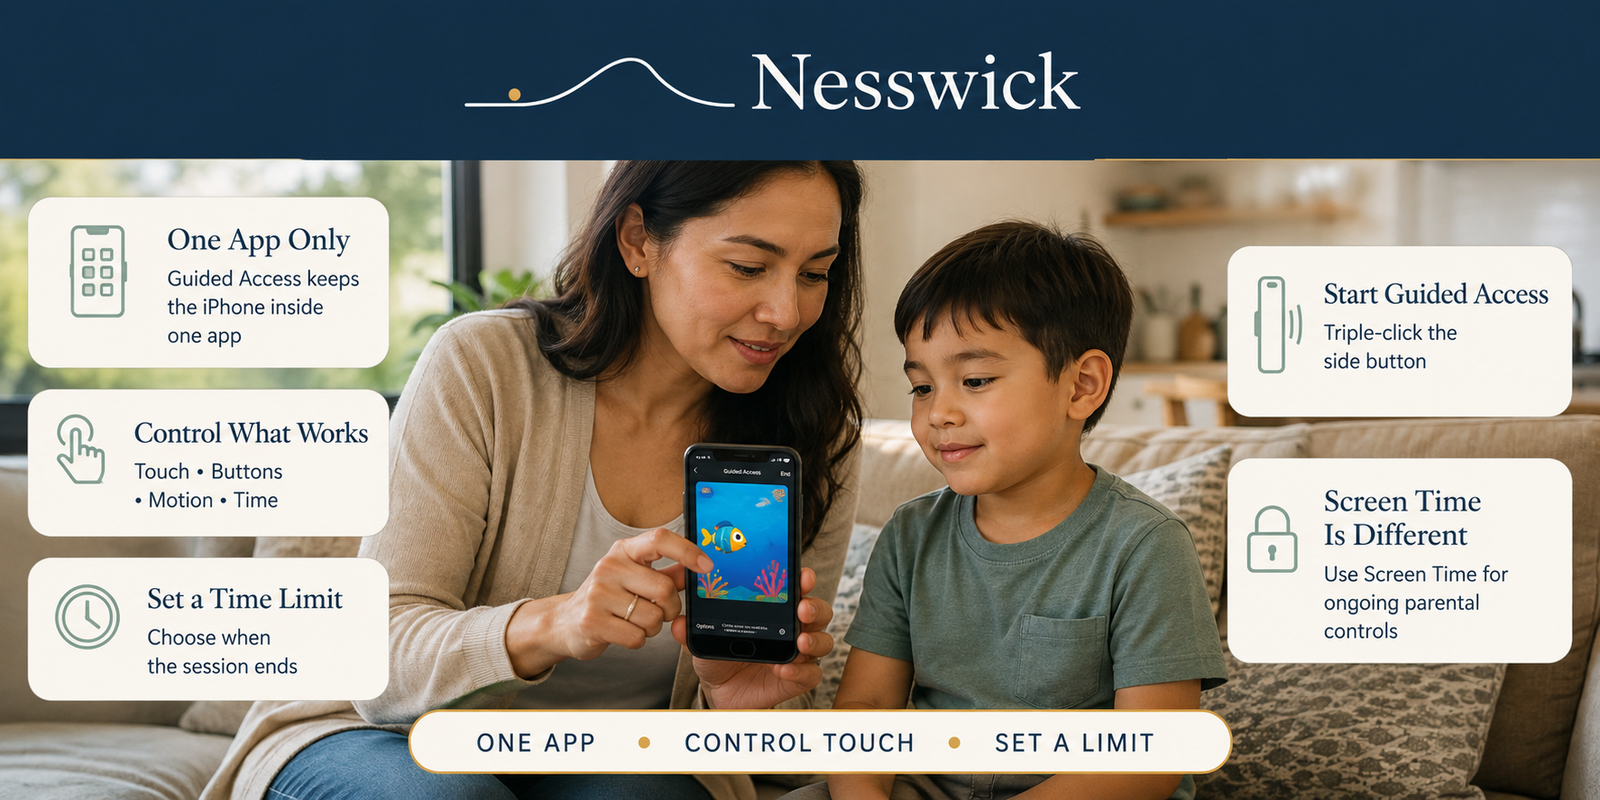
Guided Access locks your iPhone to a single app until you unlock it with a passcode or Face ID. Turn it on once in Settings > Accessibility > Guided Access, set a passcode there, then open the app you want your child to use and triple-click the side button to start a session.
It is free, it takes about two minutes to set up, and you never need to install anything. If you have been searching how to lock screen on iPhone for kids, this is the feature you were looking for.
What Guided Access Actually Does
Apple describes Guided Access as a way to temporarily restrict your iPhone to one specific app. Within a session you can also set a time limit, and choose which features, hardware buttons, and areas of the screen stay available.
In practice it prevents the specific things that go wrong when a small child holds your phone:
- Swiping out of the app into your messages, mail, or photos
- Tapping a purchase button, an ad, or a “share” icon
- Pressing the side or volume buttons
- Rotating the screen or triggering motion gestures
- Wandering into Settings
What it does not do is make the app itself appropriate. Guided Access keeps a child inside an app. It has no opinion about what is in the app. That is a different job, and it belongs to Screen Time.
Set Up Guided Access (One Time, About Two Minutes)
You only do this part once.
- Open Settings.
- Tap Accessibility.
- Tap Guided Access and turn it on.
- Tap Passcode Settings, then Set Guided Access Passcode, and enter a code.
- Still in Passcode Settings, turn on Face ID or Touch ID if you would rather end sessions that way on a supported iPhone.
Two things worth doing while you are in there:
- Under Time Limits, you can choose a Sound to play when a session’s time is up, and turn on Speak so the phone announces the time remaining.
- Under Display Auto-Lock, you can set how long before the screen locks itself during a session.
Choose the passcode carefully. Make it different from the passcode your child already watches you type to unlock the phone. If your child knows the Guided Access passcode, they may be able to end the session, so use a code they do not know.
Start a Session
- Open the app you want your child to use. You start Guided Access from inside the app, not before.
- Turn on Guided Access using any of these: triple-click the side button (or the Home button on older models), ask Siri to “turn on Guided Access,” or tap it in Control Center if you have added it there.
- Circle any areas of the screen you want to disable. Draw around them with your finger, then drag the gray mask into position or use its handles to resize it. This is how you black out a purchase button, an account icon, or a comments feed while leaving the rest of the app usable.
- Tap Session Settings and turn individual controls on or off:
- Side Button
- Volume Buttons
- Motion (stops the screen rotating or responding to other movement)
- Software Keyboards
- Touch (turns off all touch input)
- Time Limit
- Tap Done, then tap Start.
That is the whole thing. Your child is now inside one app.
The Settings That Matter Most for Young Children
Turn Touch off for watching. If your child is watching a downloaded video and does not need to interact at all, switching Touch off is the single most effective setting. No pausing, no skipping, no tapping a recommended video, no reaching the comments.
Circle the screen areas instead, for apps they do need to use. For a drawing app or a reading app, leave Touch on and mask only the parts you do not want touched. This is more work but keeps the app usable.
Turn off Volume Buttons for toddlers. A child can easily change the volume by holding the buttons, so disabling them can help during a session.
Turn Motion off during car rides. It stops the screen flipping every time the phone tilts.
Use Time Limit for a clean ending. A session that ends on its own is easier than a parent taking a phone away. Pair it with a spoken warning before it ends: technology can create the boundary, but the handover still goes better with words.
One Safety Note Worth Knowing
Apple states that Crash Detection and Emergency Services are not available while using Guided Access. You have to exit Guided Access to use Crash Detection or to place an emergency call.
At home this rarely matters. In a car it might. It is a reason to end the session when you finish a journey rather than leaving the phone locked into an app in a bag.
How to End a Session
Triple-click the side button (or the Home button on models that have one), then:
- Enter your Guided Access passcode, or
- Use Face ID or Touch ID, if you turned that on in Passcode Settings.
The phone returns to normal immediately.
When Guided Access Is the Wrong Tool
Guided Access is built for one moment: your phone, your child, one app, right now. It is not a long-term arrangement.
If the device belongs to your child, use Screen Time instead. That is where the real iPhone parental controls live: Downtime, App Limits, Communication Limits, web content filtering, and Content & Privacy Restrictions, all protected by a Screen Time passcode your child does not know. Our guide on setting up parental controls on an iPhone covers that setup in full.
If you want a permanently simplified phone, look at Assistive Access. Apple designed it to give an iPhone a simplified interface with a customizable set of core features, which is a different goal from temporarily pinning one app.
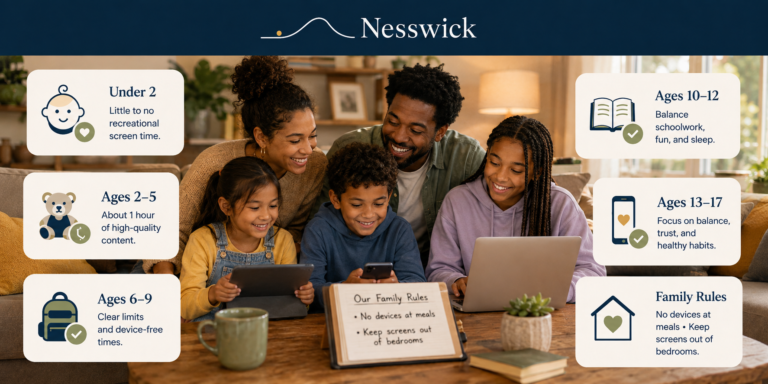
If the question is really “how much is too much”, no setting answers that. Our guide to recommended screen time by age covers what health bodies actually recommend, and why the numbers are less useful than the household rules around them.
Most families end up using two of these together: Screen Time for the ongoing rules, Guided Access for the borrowed-phone moments.
The Android Equivalent
Android has a similar feature called app pinning, sometimes called screen pinning.
According to Google’s support documentation, you turn it on in Settings > Security (or Security & location) > Advanced > App pinning, then switch it on and choose to require your PIN, pattern, or password to unpin.
To pin an app, open Overview (swipe up from the bottom and hold, or tap the Overview button), tap the app’s icon at the top, then tap Pin.
To unpin, the gesture depends on your navigation style: with gesture navigation, swipe up and hold; with two-button navigation, touch and hold Back and Home; with three-button navigation, touch and hold Back and Overview. You will then be asked for your PIN, pattern, or password.
It is less configurable than Guided Access, with no screen masking or per-control toggles, but it handles the core job. Our guide on setting up parental controls on Android covers the wider Android setup.
Troubleshooting
Triple-clicking does nothing
Guided Access has to be switched on in Settings first, and you have to already be inside the app you want to lock. If you triple-click from the Home Screen, nothing happens.
My child got out anyway
The passcode is one of the first things to check. They may have watched you enter it, or it may be the same code they use for something else. Change it and enter it out of sight.
The app stopped working properly
You probably disabled something the app needs. If a child cannot type, Software Keyboards is off. If a game will not respond, Touch is off. If a video app cannot rotate to full screen, Motion is off. End the session and restart it with the controls that app actually needs.
The session ended by itself
Either a Time Limit was set, or Display Auto-Lock kicked in. Both are in the Guided Access settings.
They can still tap things inside the app
That is expected. Guided Access controls the boundary of the app, not its contents. Turn Touch off, or circle the specific areas you want blocked before starting the session.
Frequently Asked Questions
Does Guided Access cost anything or need an app?
No. It is built into iOS and iPadOS, and it works the same way on an iPad.
Can I use it on my child’s own iPhone?
You can, but it is the wrong shape for that job. Guided Access has to be started manually each time from inside an app. For a device your child uses on their own, Screen Time is the tool.
What if I forget the Guided Access passcode?
You will not be able to end the session normally. This is why enabling Face ID or Touch ID as a second way out is worth doing during setup.
Does it block notifications?
Not by itself. Notifications are governed by your Lock Screen and Focus settings. If you do not want message previews appearing while your child holds the phone, turn off notification previews separately.
Can my child make an emergency call during a session?
No. Apple is explicit that Crash Detection and Emergency Services are unavailable during Guided Access. Exit the session first.
Is there a way to lock the screen so a baby cannot do anything at all?
Yes. Open the app, start Guided Access, and turn Touch off in Session Settings. The screen displays but does not respond.
Bottom Line
Guided Access is one of the most useful features Apple ships and one of the least advertised, largely because it sits under Accessibility rather than under anything labeled “parental.”
It costs nothing, takes two minutes to set up, and solves a narrow problem well: a young child holding your unlocked phone. It is not a safety system, it does not filter content, and it does not replace ongoing parental controls. Set the passcode to something your child has not seen, and it does the one job it was built for.

Affiliate Disclosure
Nesswick may earn a commission from some links on our site. This article contains no affiliate links, and nothing here depends on a purchase.
Sources and Methodology
This guide is research-based and built from the current official documentation for each feature described. Every step, setting name, and limitation comes from Apple’s and Google’s own support material rather than from secondary coverage. We did not test any product for this article and did not reproduce third-party reviews.
Setting names and menu paths change between operating system versions. Where Apple’s guide lists options that vary by iPhone model, such as the side button versus the Home button, or Face ID versus Touch ID, we have described both.
Sources Referenced
- Apple Support, Lock iPhone to one app with Guided Access (iPhone User Guide)
- Apple Support, Use parental controls on your child’s iPhone, iPad, and iPod touch
- Apple Support, Assistive Access User Guide
- Google Android Help, Pin and unpin screens
Last reviewed: August 2026.